Create Your First Project
Inside your Environment you can spin up a project in two ways:
- Onboarding (recommended for your first time) — a short guided flow that walks you through every decision and provisions a complete, ready-to-use setup: the project and its database, a questionnaire that tailors everything to your use case, an optional parent organization, your external services, and the authentication processes your end users will log in with. It ends by handing you the configuration values your application needs.
- Create a Project — the same wizard without the welcome guidance, handy once you know your way around and just want to add another project to your Environment.
Both start from the dashboard: a brand-new Environment offers Start onboarding and Create project; later, the Create Project button is always available.
Nothing is created until the final step. As you move through the flow Cockpit just collects your choices — you can go back and change anything; the project, database, organization, services, and authentication processes are all provisioned together when you finish.
The onboarding, step by step
1. Welcome
A short introduction. Click Create Solution (start onboarding) to begin.
2. Project
Name your project, give it a Project ID, and pick a cluster.
- The Project ID uses reverse-domain notation (e.g.
com.mycompany.myproject). It keeps projects isolated: when a user can reach several databases, only those matching the Project ID are visible to your application. - The cluster is the region where your data is hosted; choose the one closest to your users.
Creates: a new Project (a fresh iCure environment/group) and its first database. In Cockpit a database is called a Tenant. A project starts with a single database — that is, one tenant — so by default a project is single-tenant. You can switch it to multi-tenant later from its Project Configuration (the deployment-model setting), which lets the project hold several tenants.
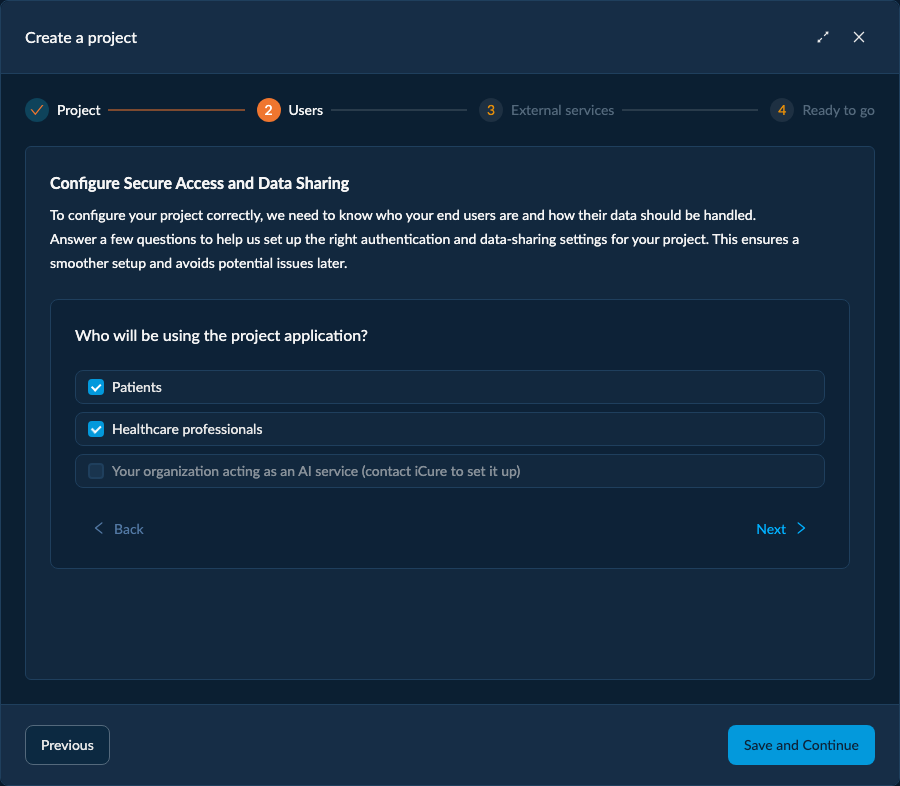
3. Users (questionnaire)
A few questions describe who uses your application and how their data is shared. Your answers configure the rest of the setup automatically:
- Who will use the application? — Patients, Healthcare professionals, and/or an AI service.
- How are healthcare professionals organized? — separate practices/clinics (multi-tenant) or one shared organization (single-tenant).
- Can professionals see each other's data? and can all professionals access all patient records? — these set the data-sharing rules.
Impacts: the data-sharing model, whether an Organization is created (next step), and which authentication processes are generated for you. (The project is created single-tenant; switching it to multi-tenant is done later from Project Configuration, not here.)
4. Organization (only when needed)
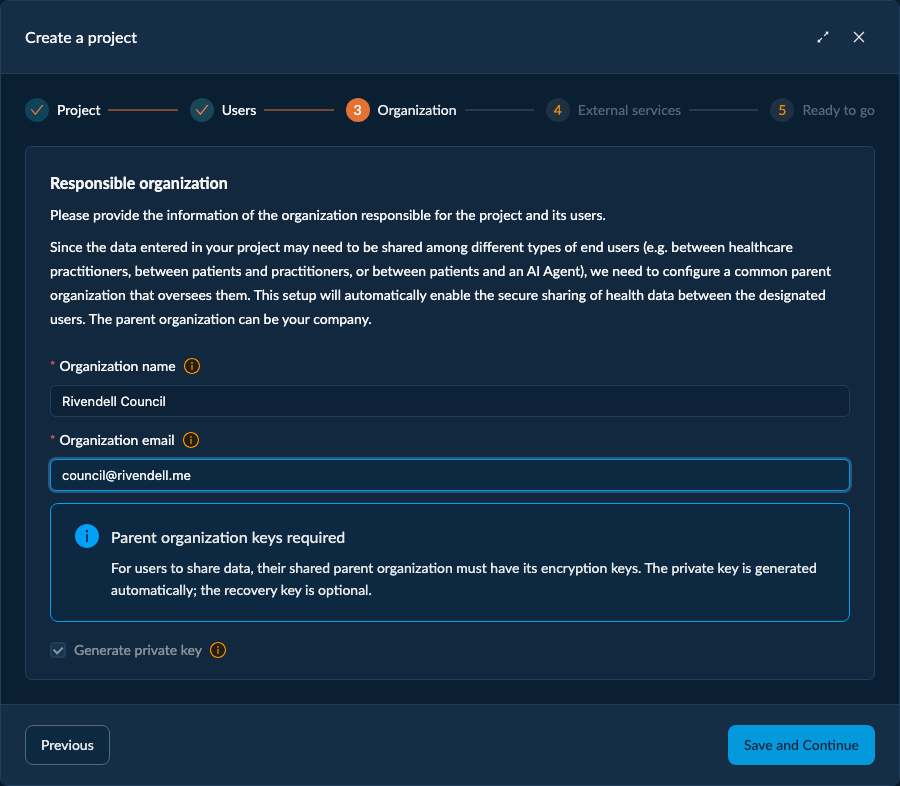
When your answers imply users share data, the flow asks you to create a parent Organization — the party that holds the encryption key used to share data between users.
- Its private key is generated automatically and can't be turned off — the organization needs it to encrypt and share data.
- A recovery key is optional (off by default). Enable it so you can restore access to the organization's data if its private key is ever lost. Like other keys, it's shown only once. See Recovery & Private Keys.
Creates: the parent Organization (an HCP) with its private key — plus a recovery key if you enabled it.
This step is skipped when the questionnaire doesn't require a shared parent (e.g. a single isolated organization with no cross-user sharing).
5. External Services
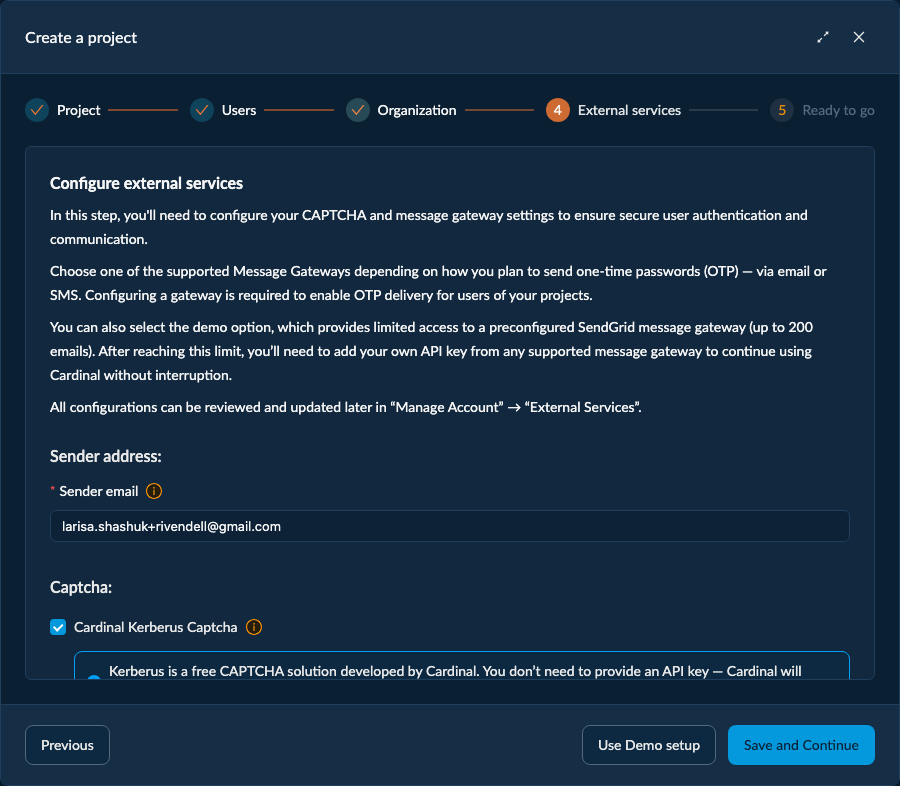
Configure the gateways your project uses to reach your users, or click Use Demo setup to get started quickly. Demo setup is limited: it includes 200 free emails that we provide so you can test how the product works — for real traffic, configure your own gateways.
- Email — SendGrid, SMTP, or Outlook.
- SMS — Twilio, OVH, Ringring, or Swisscom.
- Captcha — reCAPTCHA, Friendly Captcha, or Kerberus. Kerberus is Cardinal's own proof-of-concept captcha — free of charge, so feel free to use it.
Impacts: these power the authentication processes — they're how the one-time login codes are actually sent to your end users.
6. Ready to go
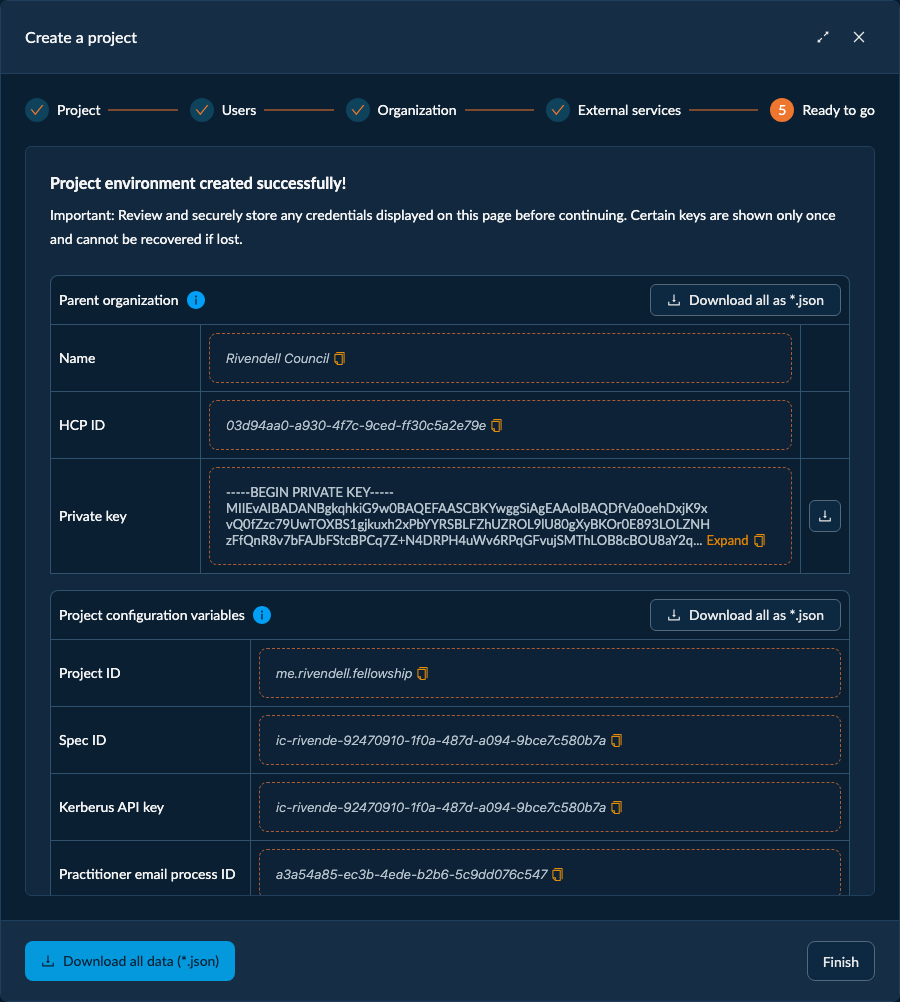
This is the payoff step: Cockpit confirms your project was created and hands you everything you need to connect your application. Take a moment here — some of it you can't get back later.
Configuration values. The identifiers the Cardinal SDK needs, each with a copy button:
- Project Application ID — your project's identifier (the reverse-domain ID you chose).
- External Services Spec ID — references the email/SMS/captcha configuration you set up.
- Captcha site key(s) — for reCAPTCHA / Friendly Captcha / Kerberus, depending on what you enabled.
- Authentication process IDs — one per channel and user type (e.g. patient vs practitioner, email vs SMS). Your application uses these so its end users can register and log in.
Parent Organization (if you created one). Its name and ID, plus the private key and — only if you enabled it — the recovery key. These two are downloadable and shown only once: save them now. If you lose the private key and have no recovery key, the organization's encrypted data cannot be recovered.
Download all as *.json. Exports the whole summary (all the values above, including the org keys) in a single file — the easiest way to hand everything to your app or store it safely.
Jump-start your app. The step also links to ready-made boilerplate apps (React, React Native, Node.js, Python) and template apps (Petra patient app, PetraCare EHR) you can clone to get going fast.
When you're done, click Finish to close the flow and land on your new project. Next, plug these values into your application — see Initialize the Cardinal SDK.
Where to go next
- Initialize the Cardinal SDK — use the "Ready to go" values in your application.
- Managing Users — add your first end users (HCPs, patients, devices).
- Project Overview & Configuration — where your project's settings, IDs, and processes live afterwards.
- External Services — set up your own email, SMS, and captcha gateways.
- Multitenancy — when and how to split a project into isolated tenants.
Cardinal SDK reference: Initialize the SDK — connect your app once the project exists.